

A decade ago, deploying an AI agent required a development team, a machine learning budget, and months of work. Today, you can have an intelligent AI agent answering customer questions on your website — or WhatsApp — in under two hours. Without writing a single line of code.
This guide walks you through exactly how to do it, what you'll need beforehand, common mistakes to avoid, and how to measure whether it's actually working.
What You'll Need Before You Start
Before opening any platform, gather these materials. Having them ready cuts setup time significantly.
Content sources (pick any combination):
- Your top 20–30 frequently asked questions (even a rough list in a Google Doc works)
- A PDF of your product documentation or service guide
- A link to your existing help centre or FAQ page
- Any policies worth automating: returns, refunds, shipping, cancellation
Business information:
- Your company name, tone of voice, and key contact details
- Which channel(s) you want to deploy on (website, WhatsApp, or both)
- Who the agent should escalate to when it can't help
Estimated prep time: 30–60 minutes to collect and organise this material.
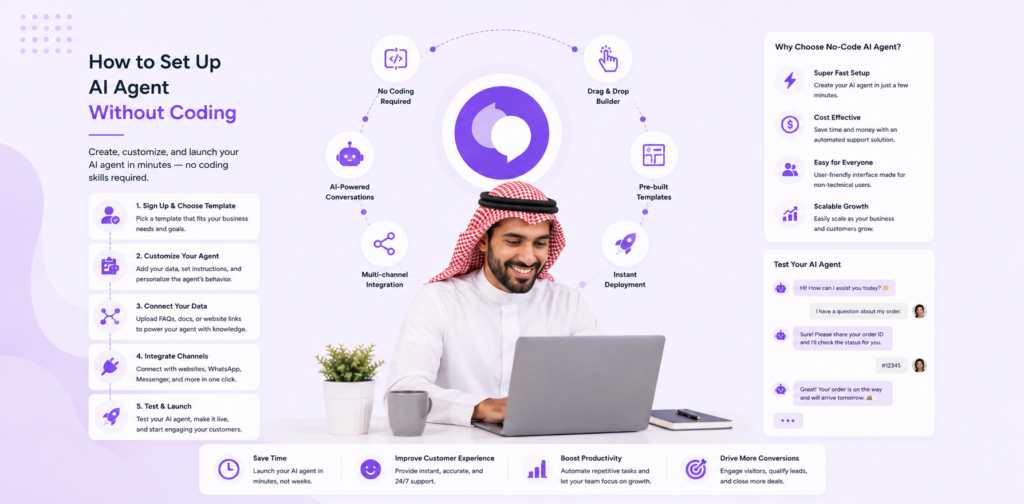
Step 1: Choose the Right No-Code Platform
Not all no-code agent platforms are equal. For AI-powered (LLM-based) agents that genuinely understand questions rather than just pattern-matching keywords, look for these features:
| Must-Have | Nice-to-Have |
|---|---|
| Knowledge base upload (PDFs, URLs, docs) | WhatsApp integration |
| Website embed widget | Team inbox for escalations |
| No credit card for free trial | Analytics and reporting |
| Human escalation path | Multi-language support |
| Customisable tone/persona | CRM integrations |
Good options include: Chatloop, Chatbase, and Tidio (each suits different use cases — see our comparison guides).
For this walkthrough, we'll use the steps common to most modern no-code platforms.
Step 2: Create Your Account and Start a New Agent
- Sign up for a free account (most platforms offer a free tier or 14-day trial)
- Navigate to "Create new agent" or "New agent"
- Give your agent a name — this is what customers will see (e.g., "Aria from Chatloop Support")
- Choose your default language
Tip: Pick an agent name and persona that reflects your brand. A friendly, named agent significantly outperforms a generic "Chat with us" widget in both engagement and customer satisfaction.
Step 3: Build Your Knowledge Base
This is the most important step. The quality of your AI agent's answers is directly proportional to the quality of your knowledge base.
Option A: Upload Documents
Upload PDFs, Word docs, or plain text files containing your FAQs, policies, and product information. Most platforms process these automatically.
Option B: Scrape Your Website
Input your website URL. The platform crawls your site pages and extracts relevant content. Good for businesses with existing help centres or detailed product pages.
Option C: Manual Q&A Entry
Type in question-and-answer pairs directly. Best for very targeted FAQs where you want to control exact responses.
Option D: Mix and Match
Most businesses use a combination: upload existing docs AND scrape a URL AND add a handful of manual Q&A pairs for common edge cases.
Recommended knowledge base minimum:
- 20+ Q&A pairs or equivalent document coverage
- Your pricing/plans page (if applicable)
- Return/refund/cancellation policy
- Contact and escalation information
What to avoid:
- Uploading content that's out of date — the AI will reference it as if it's current
- Uploading confidential information you don't want surfaced in chat
- Skipping this step and deploying a "blank" agent (it will perform poorly)
Step 4: Configure Your Agent's Behaviour
Once the knowledge base is uploaded, configure how the agent behaves:
Tone & Persona
Set the communication style:
- Formal — "We would be happy to assist you with that request."
- Friendly — "Sure! Let me check that for you 😊"
- Professional-casual — "Happy to help. Here's what I found:"
Match your brand voice. Customers notice when the agent feels incongruous with the rest of your brand experience.
Fallback Behaviour
What happens when the AI doesn't know the answer?
Configure one of these fallback responses:
- "I'm not sure about that — let me connect you with our team." → Escalate to human
- "I don't have that information yet. You can reach us at [email]." → Soft redirect
- Ask for clarification before escalating
Avoid: Having the bot make something up or give vague non-answers. Set a confidence threshold so it escalates rather than guesses.
Escalation Rules
Define when and how to hand off to a human agent:
- After X failed attempts to answer
- When the user explicitly asks for a person
- For specific topics (e.g., billing disputes, complaints)
Step 5: Customise the Chat Widget
Configure how the chat widget looks on your website:
- Colour scheme — match your brand colours
- Position — bottom-right is standard; bottom-left works well for some layouts
- Welcome message — the first thing customers see before they type
- Trigger behaviour — proactive pop-up after X seconds on page, or passive (wait for click)
High-converting welcome messages follow this formula: "Hi there! I'm [Name], your [Brand] assistant. I can help with [Topic A], [Topic B], or [Topic C]. What are you looking for today?"
Specificity converts better than generic greetings.
Step 6: Connect to Your Website
Most platforms provide a snippet of JavaScript code (typically 2–3 lines) that you paste before the closing </body> tag on your website.
For common CMS platforms:
- WordPress: Use a plugin like "Insert Headers and Footers" to add the snippet without touching code
- Shopify: Add to your theme's
theme.liquidfile under Online Store → Themes → Edit Code - Squarespace: Site Tools → Advanced → Code Injection → Footer
- Webflow: Site Settings → Custom Code → Footer Code
Test after installing: Open your website in a private/incognito window. The chat widget should appear within 5 seconds of page load.
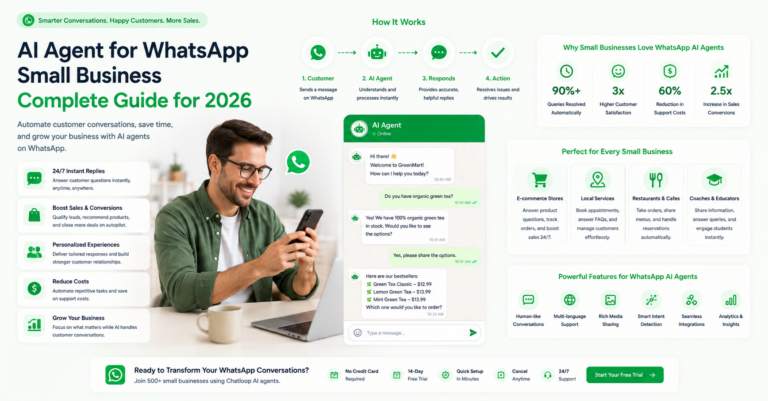
Step 7: (Optional) Connect WhatsApp
If your customers use WhatsApp, connecting it alongside your website agent multiplies your automation reach significantly.
The setup process varies by platform but typically involves:
- Creating a WhatsApp Business account (if you don't have one)
- Applying for WhatsApp Business API access (Meta verification)
- Connecting your approved number to your AI agent platform
Meta verification typically takes 1–5 business days. Start this process early if WhatsApp is part of your plan.
Step 8: Test Before Going Live
Before launching to customers, run a thorough internal test:
Test scenarios to run: [ ] 10 of your most common customer questions [ ] 3 intentionally vague or ambiguous questions [ ] A question the AI definitely shouldn't know (test fallback) [ ] A request to speak to a human (test escalation) [ ] A question in another language (if you serve international customers)
What to check:
- Accuracy of answers
- Tone consistency
- Escalation triggering correctly
- Widget loading speed
- Mobile display (test on a phone)
Step 9: Soft Launch and Monitor
Don't flip the switch to 100% immediately. A staged rollout reduces risk.
Week 1 approach:
- Deploy to your website but don't actively promote the chat widget
- Review every conversation daily
- Note questions the AI got wrong or couldn't answer
- Update your knowledge base with corrections and additions
Week 2:
- Share with your team for internal feedback
- Test with 5–10 trusted customers
- Gather feedback on experience and accuracy
Week 3–4:
- Full public launch
- Share with your customer base via email or social
- Monitor key metrics weekly (see Step 10)
Step 10: Measure What Matters
Once live, track these metrics weekly:
| Metric | What It Tells You | Target |
|---|---|---|
| Automation rate | % of conversations fully handled by AI | 40–60% |
| Escalation rate | % transferred to humans | <30% |
| Resolution rate | % of conversations where customer got an answer | >70% |
| CSAT score | Customer satisfaction with AI responses | >80% |
| Knowledge gap count | Questions AI couldn't answer | Decreasing week-on-week |
Review your "knowledge gaps" weekly and add content to fill them. Most businesses see automation rates improve significantly in the first 4–6 weeks just from this iteration process.
Common Mistakes to Avoid
1. Deploying without enough content An agent with 10 Q&A pairs will frustrate customers. Aim for 30+ before going live.
2. No escalation path If a customer hits a wall with the AI and can't reach a human, they'll leave. Always provide an out.
3. Ignoring mobile Over 60% of chat interactions happen on mobile. Test your widget on a phone before launching.
4. Static knowledge base The world changes. Products change. Policies change. Schedule a monthly review to keep your knowledge base current.
5. Skipping the soft launch Pushing directly to full launch without testing means real customers encounter bugs. The soft launch is not optional.
FAQ
Q: How long does setup take? A: With prepared materials, most businesses are live in 1–2 hours. Without pre-prepared content, allow half a day.
Q: Do I need technical skills? A: No. Modern no-code platforms handle all the technical setup. If you can use Google Docs, you can set up a no-code AI agent.
Q: What if customers don't want to talk to a bot? A: Always offer "Talk to a person" as an option. Most customers are happy with AI if it actually answers their question — the problem is only when it fails and there's no alternative.
Q: Can one AI agent handle multiple products? A: Yes. Upload documentation for all products into one knowledge base. The agent references the right content based on context.
Q: How much does it cost? A: Most platforms have free tiers adequate for testing. Paid plans typically range from $49–$99/month for small business use.
Q: How do I know if it's actually working? A: Track your automation rate and CSAT weekly. If automation rate is above 40% and CSAT above 80%, it's working. Below those thresholds, review your knowledge base.
Conclusion
Setting up a no-code AI agent in 2026 is genuinely accessible to any business owner — no technical background required. The platforms have matured to the point where the limiting factor is no longer the technology; it's the preparation and quality of the knowledge base you provide.
Follow the steps in this guide, invest 30 minutes in gathering good source material, and you'll have a working AI agent within a day.

8 Responses on this post
Comments are closed.